Part 1: The Unseen Hand of DNS
The Domain Name System (DNS) is the internet’s phonebook, translating human-friendly domain names into machine-readable IP addresses. While seemingly simple, a misconfigured DNS server can bring your entire website to a halt. When you set up a DNS server like BIND on your Google Cloud VM, everything might seem to work perfectly on the server itself, but you find that no one can connect to it. This common problem isn’t due to a bug in your software; it’s a critical, often-overlooked security feature of Google Cloud. This guide will walk you through setting up BIND, troubleshooting the common “it’s not working” issue, and a crucial lesson in understanding how cloud provider firewalls work.
Part 2: The Setup – Installing and Configuring BIND
Before we begin, you should have a fresh Ubuntu server running on Google Cloud. If you haven’t, please refer to our guide, A Beginner’s Guide to Launching a Server on Google Cloud.
Step 1: Install BIND
BIND (Berkeley Internet Name Domain) is the most widely used DNS software on the internet. We’ll install bind9 along with a utility that provides troubleshooting tools.
Bash
sudo apt update
sudo apt install bind9 dnsutils -y
Step 2: Configure a Caching-Only DNS Server
For most users, a caching-only DNS server is a great starting point. It doesn’t host domain records itself but rather speeds up name resolution by storing DNS query results. This reduces latency for your applications. We’ll edit the main configuration file for BIND to make this change.
Bash
sudo nano /etc/bind/named.conf.options
Now, paste the following content into the file. It’s a simple, secure configuration.
Bash
options {
    directory "/var/cache/bind";
    recursion yes;
    allow-recursion { 127.0.0.1; };
    listen-on-v6 { none; };
    listen-on { 127.0.0.1; };
    forwarders {
        8.8.8.8;
        8.8.4.4;
    };
    dnssec-validation auto;
};
This configuration tells BIND to only listen on the local machine (127.0.0.1), use Google’s public DNS servers for forwarding queries, and validate DNSSEC for security.
Step 3: Enable and Start the named Service
After configuring BIND, we need to restart the named service to apply our changes.
Bash
sudo systemctl enable named
sudo systemctl restart named
Step 4: Test the Configuration Locally
Before we open the firewall, let’s verify that BIND is working correctly on the server itself. We’ll use the dig command to query our local DNS server.
Bash
dig @127.0.0.1 google.com
The output should show a successful query, indicating that your BIND server is functioning. If this command fails, you have an internal configuration problem.
Part 3: The Troubleshooting – Why Isn’t It Working?
So, you’ve confirmed BIND is running and can resolve domains from the server, but when you try to use it from your local machine, it doesn’t work. This is a common pitfall for new cloud users. The reason is that all cloud providers have a default-deny policy for network traffic. Your server is a fortress, and you need to manually open the doors for DNS traffic.
First, check if your local Ubuntu firewall (UFW) is blocking traffic.
Bash
sudo ufw status
If UFW is active and not configured, you’ll need to allow DNS traffic:
Bash
sudo ufw allow 53/udp
sudo ufw allow 53/tcp
sudo ufw reload
After checking your local firewall, you might find that BIND is still unreachable. This leads to the next step.
Part 4: The Solution – Opening Ports on the Google Cloud Firewall
The final and most crucial step is to open the DNS ports in the Google Cloud Console. Unlike the local UFW, this is the first line of defense for your entire VM.
Below are default GCP FW policies that block DNS traffic.
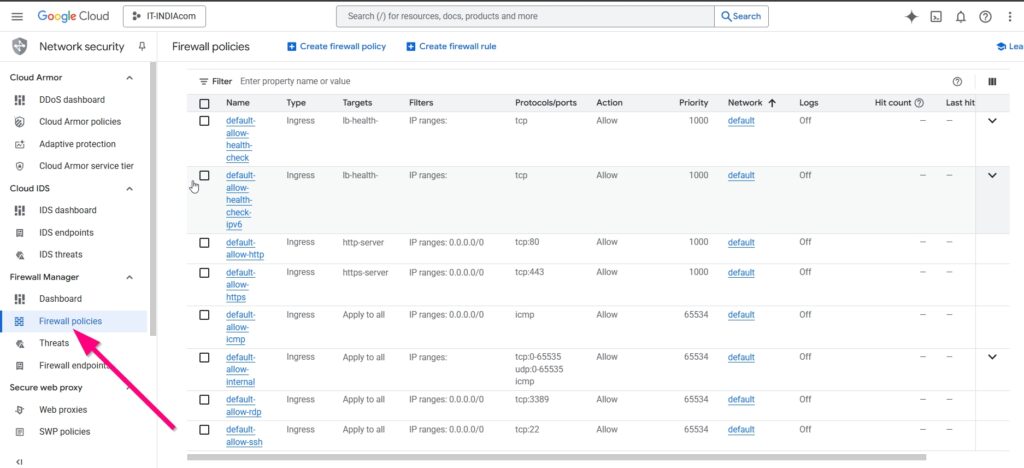
- Navigate to VPC Network → Firewall in your <a href=”https://console.cloud.google.com/” target=”_blank” rel=”noopener noreferrer”>Google Cloud Console</a>.
- Click Create Firewall Rule.
- Fill in the following details:
- Name:
allow-dns-inbound - Direction of traffic:
Ingress - Targets:
All instances in the network(or a specific tag for your VM) - Source IP ranges:
0.0.0.0/0(for public access) - Protocols and ports: Select “Specified protocols and ports” and add both
udp:53andtcp:53.
- Name:
After creating this rule, Google Cloud’s firewall will allow incoming DNS queries to your server. This is a vital lesson: your VM is secured by two separate firewalls—one on the machine itself and one at the network level provided by your cloud provider. For a full breakdown of Google Cloud’s firewall, see their official documentation.
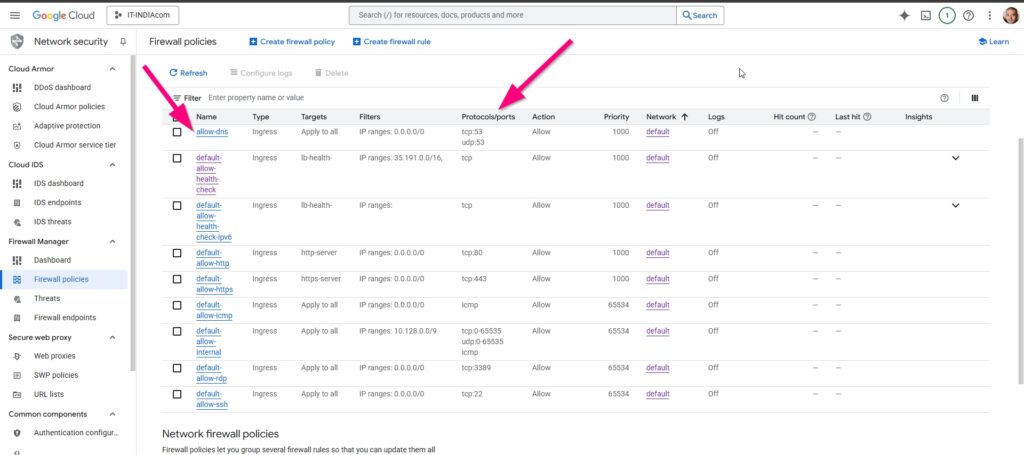
Below are fixed GCP FW policies to allow DNS traffic.
Part 5: Stats and Takeaways
More than 3.8 billion DNS queries are made every day. The BIND DNS software has a significant market share, proving its reliability and security. However, DNS is also a prime target for cyberattacks, with over 32% of companies reporting a DNS-based attack in the last year. The most common pitfalls include misconfigured internal settings, open recursion, and, as in our case, neglecting to open the correct ports on the cloud provider’s firewall. This is a powerful lesson: understanding your cloud provider’s security model is just as important as knowing the software you’re running.
You’ve now successfully installed BIND and, more importantly, learned a critical lesson in cloud security. What would have been a frustrating, dead-end problem on a different platform is a simple configuration change once you know the GCP security model. The key takeaway is to always check your cloud provider’s firewall rules first before you spend hours troubleshooting server-side configurations. This simple knowledge will save you countless hours and potential headaches.
✍️ Need Content Like This?
We craft high-quality, SEO-optimized articles tailored for blogs, news sites, and educational platforms. If you enjoy thoughtful writing and open-source spirit, just buy me a coffee and I’ll write 1,000 words for you. Let’s build something meaningful together. Contact us to get started.